Oh how I love my Kawaii Fruits haha 🙂🙂
Today I am sharing my steps on how to draw a kawaii (cute) pear 🍐
Here are the steps
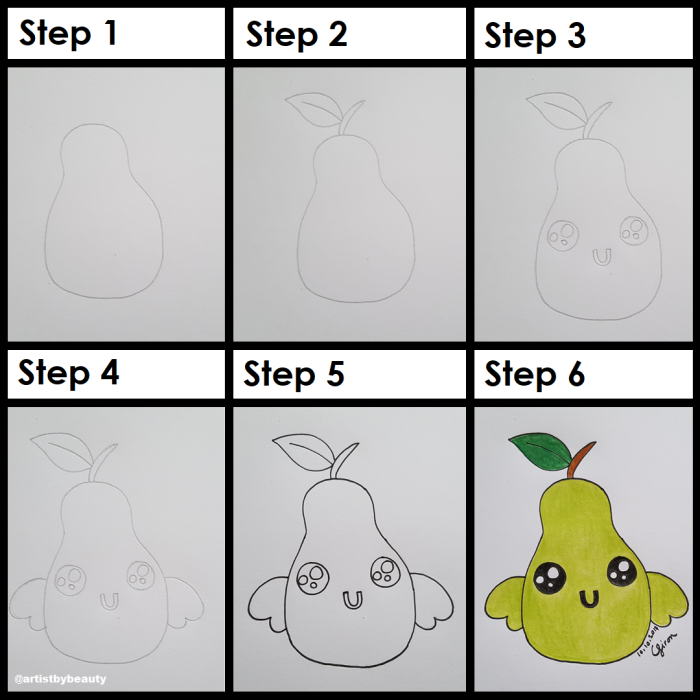
Step 1: In pencil draw the pear shape (a semi-circle bottom that does not have to be perfectly round and with the top it is smaller; as per above picture).
Step 2: In pencil draw the stem and leaf as pictured above.
Step 3: In pencil draw the eyes (circles) and the mouth (shaped like the letter – U).
Step 4: In pencil draw the cute hands (shaped like mittens).
Step 5: Draw over the pencil lines with a black fine tip pen (I used a black 0.3 fine tip Copic) and erase the pencil lines (that may still be showing after going over the drawing with a black fine tip pen).
Step 6: Colour in your kawaii pear in whatever colours you prefer (I used Faber Castell classic colouring pencils).
Yay all done! Was that not easy? Haha such a cute way to draw a kawaii pear. Thank you so much for reading.
I hope you found this photo tutorial easy to follow. You can visit my YouTube channel to watch art tutorials or click here to see some art video’s through my blog.
*** Click here to see the previous photo tutorial on how to draw a kawaii blueberry ***
Have a beautiful day!
Capili Jiron x x
You can find me on:

Must say Capili you are a great inspiration to all of us. So beautiful and an artistic mind for sure. Great post.
LikeLiked by 2 people
Aww thank you so much dear 😊😊 So sweet of you to say. That means a lot to me x x
LikeLike
Welcome dear. U r doing something so beautiful
LikeLike
Each and every time I really love these posts. It all looks so amazingly easy 😀
LikeLike
Your drawings of fruit are so cute, that one starts feeling bad about eating fruits. 😀
LikeLike
You just bring life to those fruits… They look lovely.. And you create lovely drawings… Truly inspires me to try…
LikeLiked by 1 person
Aww thank you so much sweetie 😊😊 Yay I’m so happy to hear that. Give it a go some time dear x x
LikeLike
Hmm..!! Sure..!!
LikeLiked by 1 person
Such a pretty green (: very adorable!
LikeLiked by 1 person
Aww thank you so much dear 😊😊 x x
LikeLiked by 1 person
Awesome! You know I’ve never considered myself an artist. But the step-by-step tutorials I’ve found make me feel like I am! I’ll try this! Thanks for sharing! 🙂
LikeLiked by 1 person
Thank you so much sweetie. Aww that makes me so happy to hear 😊😊 I’m so glad x x
LikeLike