Hi friends 🙂 🙂
Today I am sharing my steps with you on how to draw a kawaii (cute) watermelon 🍉
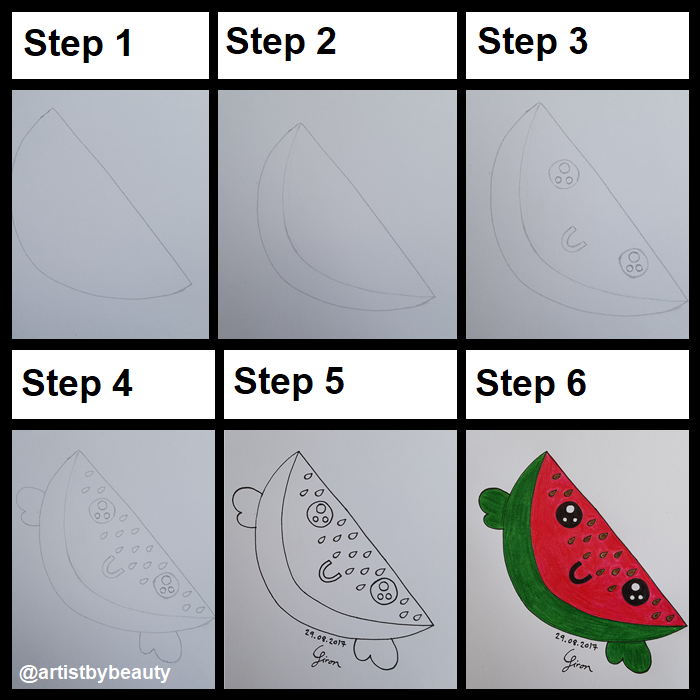
Here are the steps
Step 1: In pencil draw the watermelon shape (a curved shape – basically half a circle, it does not have to be perfectly shaped).
Step 2: In pencil draw a curved line in the watermelon shape from the left tip to the right tip as pictured above (this will create the shell/skin of the watermelon).
Step 3: In pencil draw the eyes (circles), the mouth (shaped like the letter – U)
Step 4: In pencil draw the cute hands (shaped like mittens) and draw the seeds (shaped like tear-drops).
Step 5: Draw over the pencil lines with a black fine tip pen (I used a black 0.3 fine tip Copic) and erase the pencil lines (that may still be showing after going over the drawing with a black fine tip pen).
Step 6: Colour in your kawaii watermelon in whatever colours you prefer (I used faber castell classic colouring pencils).
Yay and your done! This is a cute simple way to draw a kawaii watermelon. Thank you so much for reading.
I hope you found this photo tutorial fun and helpful. You can visit my YouTube channel to watch art tutorials or click here to see some art video’s through my blog.
Click here to see the previous photo tutorial on how to draw a kawaii banana.
Have a lovely day!
Capili Jiron x x
You can find me on:

always so clever x
LikeLiked by 1 person
Aww thank you very much dear 😊😊 x x
LikeLiked by 1 person
you are welcome x
LikeLiked by 1 person
😊😊 x x
LikeLiked by 1 person
Its really kawaii ! I’m gonna try this
LikeLiked by 1 person
Yay! 😊😊 Haha so happy to hear that dear x x
LikeLiked by 1 person
I really like these posts, your art is really Kawaii 😉
LikeLiked by 1 person
Thank you very much dear 😊😊 Haha I appreciate that x x
LikeLiked by 1 person
This was so easy to understand 🙂
LikeLiked by 1 person
Thank you dear 😊😊 I’m so happy to hear that x x
LikeLiked by 1 person
You make it sound so easy 😀 😀
LikeLiked by 1 person
Thank you beautiful 😊😊 Yay, that makes me happy to hear x x
LikeLiked by 1 person
Argh this was so pretty!!!! 😀 ❤ Have you already done a kawaii pineapple? 🙂
LikeLiked by 1 person
Aww thank you dear 😊😊 Haha not yet, I shall make that the next fruit family member. Great idea thanks x x
LikeLiked by 1 person
Yay, no problem!! I can’t wait to see the drawing!!!!! 😀 ❤
LikeLiked by 1 person
Yay 😊😊 I’m excited to draw it x x
LikeLiked by 1 person
I’m excited to see it!! 😀 ❤
LikeLiked by 1 person
Yay 😊😊 x x
LikeLiked by 1 person
That’s a really cool looking watermelon. 🙂
LikeLiked by 1 person
Thank you dear 😊😊 x x
LikeLiked by 1 person